by Mother nature network (MNN)
Materials
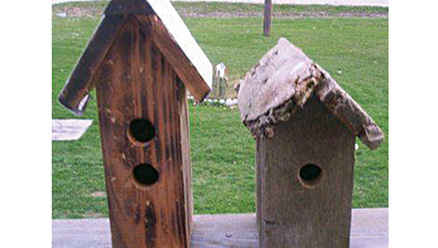
-Scrap wood-Hand saw or power miter saw-Miter box-Wood glue (indoor or exterior depending on where your houses will end up)-Hammer and nails or nail gun and nails (we used a brad nail gun with 1 ¼ nails) - galvanized nails are best if you’ll be placing your bird house outside-100 grit sandpaper-Carpenter square and or ruler-Spade bit to make the bird hole. You can use anywhere between a 1 to a 1.5 inch; the larger the house, the larger the hole for visual balance. There are so many variations on what your bird houses may look like. It depends on your style and also the materials that you gather. The biggest factor will be the size of the scrap wood. Every time we gathered new pallets of scrap wood each batch had a different size and different texture to the wood. The batch we used for this how-to demonstration was very wide about 4.5 inches, which made nice little square houses but required sanding because it was very rough and gave us splinters just handling it. The wood was about half to three-quarters of an inch thick depending on the pieces, they were slight variation among them.
Materials
-Scrap wood-Hand saw or power miter saw-Miter box-Wood glue (indoor or exterior depending on where your houses will end up)-Hammer and nails or nail gun and nails (we used a brad nail gun with 1 ¼ nails) - galvanized nails are best if you’ll be placing your bird house outside-100 grit sandpaper-Carpenter square and or ruler-Spade bit to make the bird hole. You can use anywhere between a 1 to a 1.5 inch; the larger the house, the larger the hole for visual balance. There are so many variations on what your bird houses may look like. It depends on your style and also the materials that you gather. The biggest factor will be the size of the scrap wood. Every time we gathered new pallets of scrap wood each batch had a different size and different texture to the wood. The batch we used for this how-to demonstration was very wide about 4.5 inches, which made nice little square houses but required sanding because it was very rough and gave us splinters just handling it. The wood was about half to three-quarters of an inch thick depending on the pieces, they were slight variation among them.
Step 1: Choosing and cutting the wood
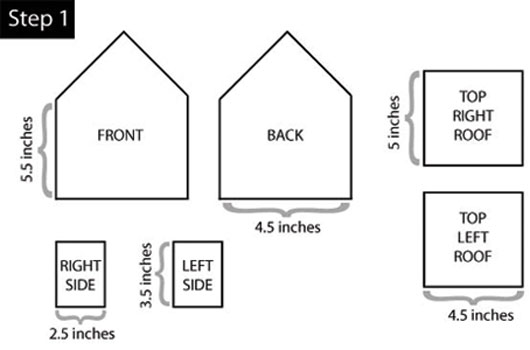
a) The first thing you’ll want to do is gather your scrap wood. You’ll want pieces that are all roughly the same size—width, depth, length—and in good shape. You’ll need enough to make the front and back, two sides, a bottom, and you’ll need two pieces for the roof. Depending on the condition of the wood, usually two or three pieces of a pallet can be torn off and cut down into about seven smaller pieces for one bird house.b) Remove all nails and staples from the wood and pick out the best pieces for your project.c) Cut the front and back of the bird house first. We usually cut them at the same time so the angles are identical. To get it perfect our miter saw is set at a 47 degree angle (45 on our saw just didn’t get it right), but your saw may be different. For this house the front and back were 5.5 inches tall at its point and 4.5 inches wide. To find the point to cut the angle and pitch of the roof you’ll need a carpenter square to measure and mark the center of the wood. Position the square at the upper edge of the wood and draw a line from the center to the matching measurement at the side. It will make a triangle in the middle. Do this on each side of the front and back piece of the birdhouse. Cut on the lines using your hand saw or miter saw.d) To decide where to place your hole on the front of the house draw a line from the tip of your roof down to where you want to put the bird hole. Draw a second line that crosses the first so you have a “t” or a cross. Place the tip of your spade bit on the cross section to get your hole centered. Now make your hole.e) Measure out the two sides of your house—they should be the same height as your front and back (without the pitched roof). Once you have marked the right size cut the sides of the house. Our sides were 3.5 inches tall and 2.5 inches wide.f) Now measure and cut the top of the house. The length of the roof will depend on your personal taste, whether or not you want an overhang in the front and back, just the front, or neither. We put the back flush and had an overhang just in the front. Our two roof pieces were both 5 inches long, but we cut half an inch off the width of one to make it fit right. Your longer roof piece should be as much longer as the width of your other piece. The width of our roof pieces were around half an inch so one roof piece is cut at 4.5 inches while the other was cut at 5 inches.g) The base is the final piece to cut. This is also entirely up to taste. You may want to leave the bottom open, or have it completely flush with the walls, or you may want a decorative base for accessories. Our base piece was a much wider piece of wood from the pallet, approximately 5.75 inches wide and 6.5 inches long. We put the back of the base flush with the house and left about half to three-quarters of an inch on each side and about 3 inches in the front, like a porch.
a) The first thing you’ll want to do is gather your scrap wood. You’ll want pieces that are all roughly the same size—width, depth, length—and in good shape. You’ll need enough to make the front and back, two sides, a bottom, and you’ll need two pieces for the roof. Depending on the condition of the wood, usually two or three pieces of a pallet can be torn off and cut down into about seven smaller pieces for one bird house.b) Remove all nails and staples from the wood and pick out the best pieces for your project.c) Cut the front and back of the bird house first. We usually cut them at the same time so the angles are identical. To get it perfect our miter saw is set at a 47 degree angle (45 on our saw just didn’t get it right), but your saw may be different. For this house the front and back were 5.5 inches tall at its point and 4.5 inches wide. To find the point to cut the angle and pitch of the roof you’ll need a carpenter square to measure and mark the center of the wood. Position the square at the upper edge of the wood and draw a line from the center to the matching measurement at the side. It will make a triangle in the middle. Do this on each side of the front and back piece of the birdhouse. Cut on the lines using your hand saw or miter saw.d) To decide where to place your hole on the front of the house draw a line from the tip of your roof down to where you want to put the bird hole. Draw a second line that crosses the first so you have a “t” or a cross. Place the tip of your spade bit on the cross section to get your hole centered. Now make your hole.e) Measure out the two sides of your house—they should be the same height as your front and back (without the pitched roof). Once you have marked the right size cut the sides of the house. Our sides were 3.5 inches tall and 2.5 inches wide.f) Now measure and cut the top of the house. The length of the roof will depend on your personal taste, whether or not you want an overhang in the front and back, just the front, or neither. We put the back flush and had an overhang just in the front. Our two roof pieces were both 5 inches long, but we cut half an inch off the width of one to make it fit right. Your longer roof piece should be as much longer as the width of your other piece. The width of our roof pieces were around half an inch so one roof piece is cut at 4.5 inches while the other was cut at 5 inches.g) The base is the final piece to cut. This is also entirely up to taste. You may want to leave the bottom open, or have it completely flush with the walls, or you may want a decorative base for accessories. Our base piece was a much wider piece of wood from the pallet, approximately 5.75 inches wide and 6.5 inches long. We put the back of the base flush with the house and left about half to three-quarters of an inch on each side and about 3 inches in the front, like a porch.
Step 2: Assembling the walls
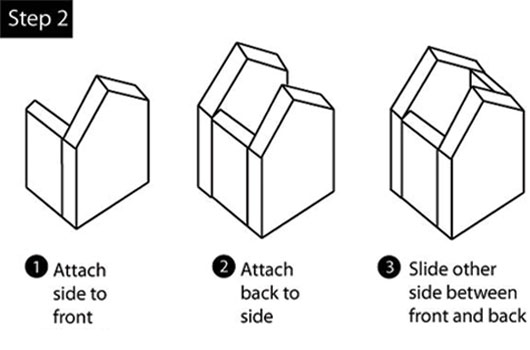
h) Before you start gluing and nailing the four walls together, try a dry run and hold them all together to see how they fit. Start with the front and glue one side to it. Place a nail in the top and bottom corners.i) Next, attach the back to the side. Same as before, glue along the edges, push together, and nail top and bottom corners. Then slide the other side between the front and back.j) If everything lines up and is square, go around and add more nails to make it sturdier. If it doesn’t line up try adjusting until it does by wiggling it and pushing the pieces around. You may have to remove nails to move the pieces around and get them square.
h) Before you start gluing and nailing the four walls together, try a dry run and hold them all together to see how they fit. Start with the front and glue one side to it. Place a nail in the top and bottom corners.i) Next, attach the back to the side. Same as before, glue along the edges, push together, and nail top and bottom corners. Then slide the other side between the front and back.j) If everything lines up and is square, go around and add more nails to make it sturdier. If it doesn’t line up try adjusting until it does by wiggling it and pushing the pieces around. You may have to remove nails to move the pieces around and get them square.
Step 3: Assembling the roof and base
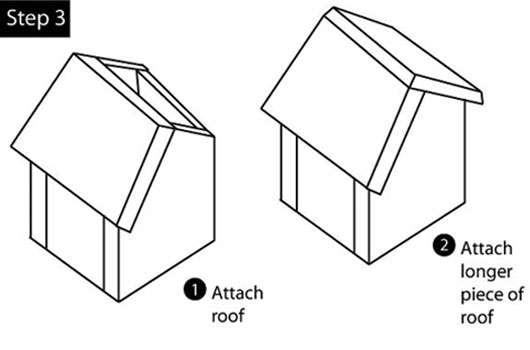
k) Now you can move on to the roof. Attach the shorter piece and then slide the longer side into place and attach it. The longer side will overlay the shorter. Nail together. We usually don’t try to glue the top, but you can if you want.l) Now you are ready to attach the base. Flip the birdhouse over and fit it into place and nail together add glue if you want.m) With the bird house all put together, you can stain, paint or decorate it as you wish. (We had a scrap piece left over from cutting the roof that turned out to be a perfect chimney.) Note: These directions are for decorative bird houses. If you want to build an actual bird friendly structure for your feathered friends to reside in you’ll have to make some changes. Real bird houses need ventilation holes around the top where the roof and sides meet as well as a few drainage holes drilled into the base in case water gets in the house. Bird houses should also have a hinged or pivoting side to clean out debris easily. Different species of birds also have different requirements like size of the hole, size of house, and height and placement for mounting. Two excellent books to consult for bird house building are: The Ultimate Birdhouse Book: 40 Functional, Fantastic and Fanciful Houses by Deborah Morgenthal and The Birdhouse Builder’s Manual by Charles Grodski. Story by Wenona Napolitano. This article originally appeared in "Plenty" in May 2008.
k) Now you can move on to the roof. Attach the shorter piece and then slide the longer side into place and attach it. The longer side will overlay the shorter. Nail together. We usually don’t try to glue the top, but you can if you want.l) Now you are ready to attach the base. Flip the birdhouse over and fit it into place and nail together add glue if you want.m) With the bird house all put together, you can stain, paint or decorate it as you wish. (We had a scrap piece left over from cutting the roof that turned out to be a perfect chimney.) Note: These directions are for decorative bird houses. If you want to build an actual bird friendly structure for your feathered friends to reside in you’ll have to make some changes. Real bird houses need ventilation holes around the top where the roof and sides meet as well as a few drainage holes drilled into the base in case water gets in the house. Bird houses should also have a hinged or pivoting side to clean out debris easily. Different species of birds also have different requirements like size of the hole, size of house, and height and placement for mounting. Two excellent books to consult for bird house building are: The Ultimate Birdhouse Book: 40 Functional, Fantastic and Fanciful Houses by Deborah Morgenthal and The Birdhouse Builder’s Manual by Charles Grodski. Story by Wenona Napolitano. This article originally appeared in "Plenty" in May 2008.
 RSS Feed
